


Do you come across a situation very often where you have likely spent hours modelling a stunning architectural project in Blender and get stuck before the process ends? You’ve got the perfect floor plan, beautiful textures and everything looks amazing in the viewport, but then suddenly when you hit render, something goes off. The image looks grainy, flat or just not what you expected? Well, you are not alone.
Even experienced architects and 3D artists run into Blender rendering mistakes that turn potential masterpieces into disappointing results. The good news is that most of these issues have simple fixes.
Let’s walk through the most common problems and how to solve them, so that your next architectural visualization truly shines.
Table of Contents:
- Overcomplicating Geometry: Less Is Often More
- Poor Lighting Setups: Why Your Renders Look Flat
- Incorrect Camera Positioning: Framing Matters
- How to Use HDRI for Instant Realism
- Adaptive Sampling: Smarter Rendering for Cleaner Results
- Conclusion: Take Your Architectural Renders to the Next Level
- Frequently Asked Questions (FAQs)
Overcomplicating Geometry: Less Is Often More
One of the most common Blender rendering mistakes is overcomplicating geometry. Here’s a fact we cannot deny: more polygons don’t always mean better quality. Architects and designers often add unnecessary details to models thinking it will improve practicality but this usually just slows down rendering and makes the scenes harder to manage.
The best solution to keep your geometry clean and optimized. You can use modifiers like Subdivision Surface wisely and only on objects that genuinely need it. It is best advised to use simpler meshes for distant elements or objects. Another thing you can try is to use modular assets instead of modelling each brick and bolts individually.
You can also then apply the Decimate modifier to reduce the polygon count on complex models. Another advise is to enable the GPU rendering in the edit system settings. This will make it easier to handle heavier scenes with more efficiency.
Overall remember that your client cares about the space feels rather than how many vertices or elements you have used. Using a clean and optimised model renders faster and gives you more space to focus more on more essential elements such as compositions and lighting.
Recommended Reading:
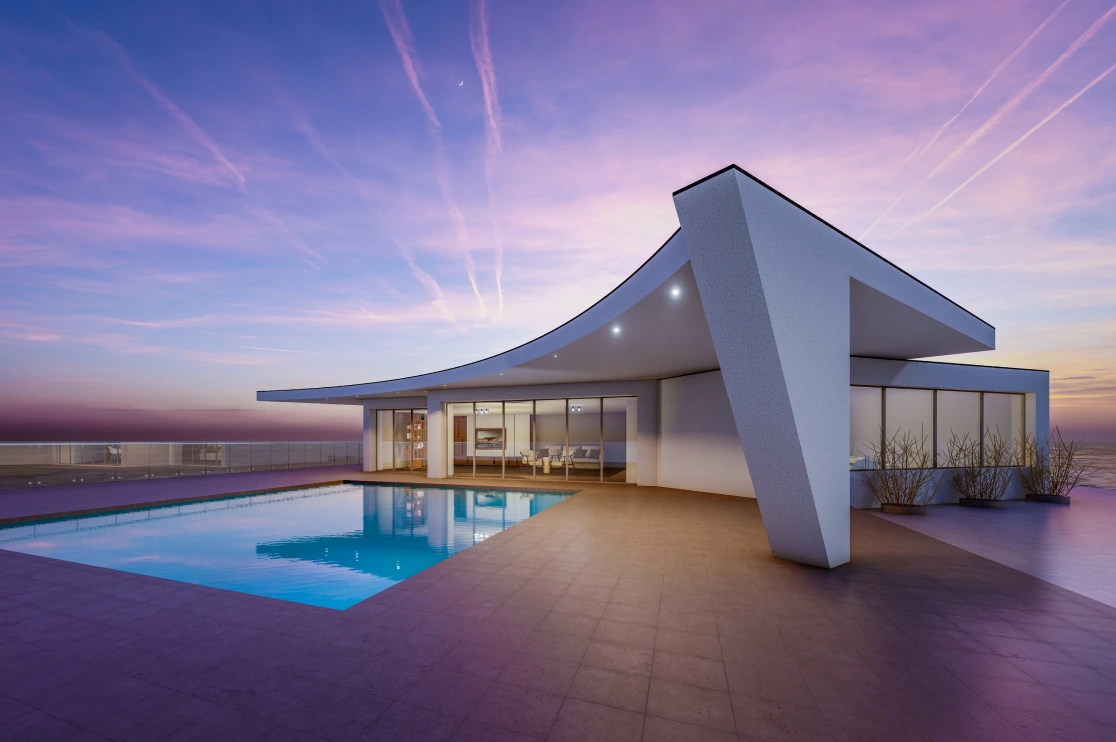
Poor Lighting Setups: Why Your Renders Look Flat
You might be pretty much aware that lighting can either make or break an architectural render. If there is no proper illumination, irrespective of how beautiful a design may be, the space looks dull and lifeless. In fact, using poor lighting setups like relying on default lamps, placing lights at wrong angles, or using harsh artificial lighting without natural context are among common Blender rendering mistakes.
While three-point lighting is a great technique for product visualization, architectural rendering demands a different, more naturalistic approach. The goal is to simulate how light behaves in the real world. For architecture, the most effective foundation is combining an HDRI environment map with a carefully positioned sun lamp.
Here’s how to fix flat lighting in your architectural scenes:
-
Start with an HDRI – This provides realistic ambient light, natural color temperatures, and believable reflections on glass and metal surfaces.
-
Add a Sun Lamp – Unlike product lighting, architecture benefits from defined, directional shadows. A sun lamp gives you control over shadow hardness and angle, helping emphasize texture and form.
-
Adjust intensity – Balance the HDRI’s strength (typically 0.5–1.5) with the sun lamp’s power (2–5) to achieve a natural look.
-
For interiors – Supplement with area lights behind windows or mesh lights on fixtures to create depth without washing out the scene.
Pro tip: For exterior shots, pay close attention to sun direction. A building lit from the front appears flat; side or angled lighting emphasizes texture, depth, and architectural form.
Recommended Reading:
Incorrect Camera Positioning: Framing Matters
You’ve probably seen renders where the building looks distorted or the perspective feels very off. That’s usually a camera positioning issue. Many beginners either place the camera too close (causing distortion) or choose angles that don’t showcase the design’s best features.
So how do you fix this? Place the camera rightly. The placement matters and contributes equally to the storytelling.
Most experts recommend adjusting focal length in camera properties settings. As a suggestion:
-
For architectural exteriors, 24mm-35mm works well.
-
For interiors, 16mm-24mm helps capture space without excessive distortion.
Beyond focal length, one key principle in architectural visualization is vertical alignment. Your camera’s vertical axis must be perfectly straight (parallel to the building’s vertical lines) unless you are intentionally creating an artistic effect. Tilted verticals make buildings appear to be falling backward or leaning, which distorts the professional quality of your render. Use the camera’s “Align to View” tool carefully, or manually adjust the pitch and roll to maintain true verticals.
Moreover, use the Rule of Thirds to compose balanced shots. You can even experiment with different perspectives like bird’s-eye views to show context.
However, remember that your camera is your client’s eye. Show them what matters. A slight angle shift can reveal hidden design details or create a more emotional connection to the space.
How to Use HDRI for Instant Realism
If you’re not using HDRI lighting yet, you’re missing out on one of the easiest ways to achieve photorealism. HDRI (High Dynamic Range Imaging) maps provide realistic lighting and reflections based on real-world environments. They’re a game-changer for architectural visualization tips.
For this, adding an HDRI is surprisingly simple. Load your HDRI and adjust intensity to match your scene’s mood
For architectural renders, HDRIs create natural ambient light that wraps around your building beautifully. They also produce realistic reflections on glass and metal surfaces.
Pro tip: If your HDRI makes shadows too soft, add a sun lamp to create defined shadows and directional light. The combination gives you both natural ambiance and intentional contrast.
Recommended Reading:
Adaptive Sampling: Smarter Rendering for Cleaner Results
If your render looks grainy with little bright dots everywhere, that usually means your sampling settings aren’t quite right. A lot of people just crank up the samples to 500 or 1000 to fix it, but that mostly makes the render slower without really solving the issue.
Here’s what actually can help: Turn on Adaptive Sampling in Cycles. It automatically spends more time on the noisy areas and less on parts that already look clean.
-
Go to Render Properties and then Sampling and check Adaptive Sampling
-
Set Noise Threshold between 0.01 and 0.03
-
Start with Min Samples: 32 and Max Samples: 512, then tweak as needed
To get rid of those bright specks (fireflies), use clamping.
Set Clamp Direct and Clamp Indirect to about 2.0–3.0. This stops overly bright pixels without messing up your overall exposure.
And don’t forget denoising; it’s could be a lifesaver.
Turn on OpenImageDenoise (or OptiX if you have an RTX card) to clean up leftover noise while keeping details sharp.
Conclusion: Take Your Architectural Renders to the Next Level
Mastering Blender rendering mistakes isn’t about perfection; it’s about knowing where to focus your energy. Simplify your geometry and set up lighting intentionally. Frame your camera thoughtfully and let HDRI and adaptive sampling do the heavy lifting. These small changes can add up to professional and photorealistic results that impress clients and communicate your design vision clearly.
At BluEnt, we understand that great design deserves great presentation. Whether you’re an architect, interior designer, or real estate developer, our team specializes in architectural visualization and 3D rendering services that bring your projects to life. We don’t just create images; we craft visual stories that resonate with your audience and help you win more business.
Ready to elevate your next project? Visit BluEntCAD to see how our rendering expertise can support your workflow. From outdoor scenes to indoor walkthroughs, we help you put your best work forward.
Frequently Asked Questions
Why are my Blender renders coming out black?Check your camera placement as it might be facing the wrong direction. Also ensure you have lights in the scene or an HDRI active.
How many samples should I use for architectural renders?For final renders, 256–512 samples with adaptive sampling and denoising usually produce clean results. For animations, 128–256 samples may serve.
What’s the best render engine for architecture in Blender?Cycles is ideal for photorealistic architectural visualization. Eevee works well for previews and real-time walkthroughs.
How do I reduce fireflies in my render?Enable Clamp Direct and Indirect under Sampling settings (start at 2.0), increase samples, and use Denoising.
Can BluEnt help with my architectural rendering projects?Yes. BluEnt provides high-quality architectural visualization services tailored to architects, designers, and developers. Visit bluentcad.com to learn more.


 Architecture Industry Outlook: CAD 2025 Report Card & 2026 Trend Radar
  White House Renovation: Everything You Should Know About Neoclassical Architecture
  Key Elements of Contemporary Architecture: What Truly Defines the Modern Architectural Style?
  Introducing International Style Architecture for Modern Interiors